A ha! First step in setting my home lab!
In this post I will explain how to install and configure, in a fast and easy way, a firewall on a Linux Debian 10 system, to allow only two things:
- web browsing traffic to the Internet
- Incoming SSH connections
So, let's begin. We will
- Set a static IP for our host
- Install UFW as firewall and configure it
Setting a static IP for our host
For further configuration we will change our network address to be a static one. In my recent installed Debian 10 system the ip address is dinamic. In my particular case the IP asigned by the router is the 192.168.0.19
We can verify the IP addresses with the command ip a
$ ip a
1: lo: <LOOPBACK,UP,LOWER_UP> mtu 65536 qdisc noqueue state UNKNOWN group default qlen 1000
    link/loopback 00:00:00:00:00:00 brd 00:00:00:00:00:00
    inet 127.0.0.1/8 scope host lo
       valid_lft forever preferred_lft forever
    inet6 ::1/128 scope host
       valid_lft forever preferred_lft forever
2: eno1: <BROADCAST,MULTICAST,UP,LOWER_UP> mtu 1500 qdisc pfifo_fast state UP group default qlen 1000
    link/ether 2c:41:38:ae:bc:14 brd ff:ff:ff:ff:ff:ff
    inet 192.168.0.19/24 brd 192.168.0.255 scope global dynamic noprefixroute eno1
       valid_lft 587730sec preferred_lft 587730sec
    inet6 fe80::2e41:38ff:feae:bc14/64 scope link noprefixroute
       valid_lft forever preferred_lft forever
So to et 192.168.0.10 as our IP we will add the following lines to the /etc/network/interfaces to s.
# Static IP for our Ethernet interface
iface eth0 inet static
    address 192.168.0.10
    netmask 255.255.255.0
    gateway 192.168.0.1
    dns-search mundo-R.com
    dns-nameserver 213.60.205.175
    dns-nameserver 213.60.205.174
Notice that as DNS name servers and search values I have set those told by my Internet provider, and normally set in /etc/resolv.conf file in a default dynamic IP address assignation
And this line in /etc/hosts (hppro3300 is my host name and ciges.net my domain name)
192.168.0.10 hppro3300.ciges.net hppro3300Setting up a firewall with UFW to allow outgoing traffic only in the port 80
UFW, or "Uncomplicated Firewall", is a simple interface to iptables, so it should be an easy way to set our firewall.
So, first, we install (as user root) the firewall and Gufw, a graphical interface to configure it.
apt install ufw gufwAfter installation the firewall is enabled by default. The commands to set the rules to allow outgoing HTTP traffic and ingoing connections using SSH will be:
ufw default deny incoming
ufw default deny outgoing
ufw allow out http
ufw allow out https
ufw allow out ssh
ufw allow out dns
ufw allow in ssh
They are clear:
- first we deny everything
- then allow outgoing traffic for HTTP, HTTPS, DNS and SSH (ports 80, 443, 53 and 22). DNS (port 53) is needed!, if we dont allow it then no URL will be found 🙂
- allow SSH connections to our host to allow opening terminals from another computers in our network
To verify our firewall status the command line will be:
$ ufw status verbose
Status: active
Logging: on (low)
Default: deny (incoming), deny (outgoing), disabled (routed)
New profiles: skip

To                         Action      From
--                         ------      ----
22/tcp                     ALLOW IN    Anywhere
22/tcp (v6)                ALLOW IN    Anywhere (v6)

80/tcp                     ALLOW OUT   Anywhere
443/tcp                    ALLOW OUT   Anywhere
22/tcp                     ALLOW OUT   Anywhere
53 (DNS)                   ALLOW OUT   Anywhere
80/tcp (v6)                ALLOW OUT   Anywhere (v6)
443/tcp (v6)               ALLOW OUT   Anywhere (v6)
22/tcp (v6)                ALLOW OUT   Anywhere (v6)
53 (DNS (v6))              ALLOW OUT   Anywhere (v6)
We could easily enable and disable the firewall with the commands:
ufw enable
ufw disable
I have installed a graphical interface, but I prefer to use the command line when it's not too hard, as in this case 🙂
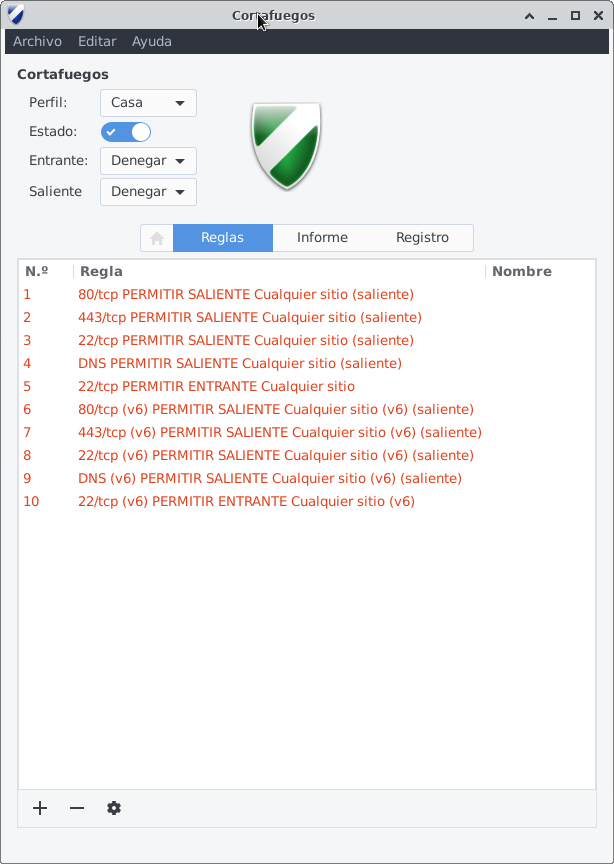
If we run Gufw we can see the rules recently set, as shown here (the screenshot shows the interface in Spanish, but it's clear anyway)
Well, it's done!
Next step, setting an HTTP Proxy with user authentication, but that is another story ...
- Deploying a DevOps playground at home with Debian Linux and VirtualBox
- Installing a firewall on a Linux host, quick and dirty, with UFW
- Protecting my public Linux host from brute force SSH attacks